Vera User Guide
View the slides from the April 30, 2021 lecture Using Vera
Vera is a dedicated cluster for the McWilliams Center for Cosmology and Astrophysics at Carnegie Mellon University.
Getting Started
To get access to Vera, you must:
- create a PSC username and password, if you don't already have those
- request an allocation on Vera (if you are faculty) or get added to a Vera allocation (if you are a student)
Create a PSC username and password
If you have an active account on any other PSC system:
PSC usernames and passwords are the same across all PSC systems. You will use the same username and password on Vera as for your other PSC account.
If you do not have an active account on any other PSC system:
You must create a PSC username and password.
-
Create your PSC username by completing this form. You will receive an email message when your username has been created.
-
When your username is ready, create a PSC password (sometimes called "Kerberos password"). Go to the web-based PSC password change utility to set your PSC password.
Apply for an allocation
If you are faculty or staff, request an allocation on Vera
Complete the PSC account request form to request an allocation on Vera for your group. List the usernames for all the members of your group who should have access to this allocation in that form.
If you are a student, get added to a Vera allocation
Have your advisor send email to grants@psc.edu asking to add you to their Vera account. Your advisor will need your PSC username in order to add you.
Changing your PSC password
There are two ways to change or reset your PSC password:
- Use the web-based PSC password change utility
- Use the kpasswd command when logged into a PSC system. Do not use the passwd command.
When you change your PSC password, whether you do it via the online utility or via the kpasswd command on a PSC system, you change it on all PSC systems.
How to get help or report a problem
If you have questions or issues at any time, you can send email to help@psc.edu.
Please include only one question or issue per email; it will help us to track and solve any issues more quickly and efficiently.
Be sure to include
- an informative subject line
- your username
If the question concerns a particular job, include these in addition:
- the JobID
- any error messages you received
- the date and time the job ran
- link to job scripts, output and data files
- the software being used, and versions when appropriate
- a screenshot of the error or the output file showing the error, if possible
System configuration
The Vera system consists of the following compute nodes:
| Node name | RAM | CPUs | Cores | GPUs | Cache | Node-local storage |
|---|---|---|---|---|---|---|
| r001-r006, r009-020 | 256GB DDR4-2133 | 2 Intel Haswell (E5-2695 v3) CPUs; 14 cores/CPU; 2.3 - 3.3 GHz | 28 cores | N/A | 35MB LLC | 2 HDDs, 4TB each |
| r007-008, r021-032 | 128GB DDR4-2133 | 2 Intel Haswell (E5-2695 v3) CPUs; 14 cores/CPU; 2.3 - 3.3 GHz | 28 cores | N/A | 35MB LLC | 2 HDDs, 4TB each |
| henon01-henon02 | 512GB | 2 AMD EPYC 7742 CPUs: 64 cores/CPU | 128 cores, 256 threads | N/A | 32MB | |
| henon03-henon08 | 512GB | 2 AMD EPYC 7542 CPUs: 32 cores/CPU | 64 cores, 128 threads | N/A | 16MB | |
| henon-gpu01 | 512GB | 2 AMD EPYC 7542 CPUs: 32 cores/CPU | 64 cores | 2 A100 | 16MB | |
| miko | Intel Xeon 6526Y: 16 cores/CPU | 16 | 2 H100 | |||
| rita | 256GB | 4 AMD EPYS 7763 CPUs: 64 cores/CPU | 256 | 2 A100, 80GB | 256MB L3 | |
| sirius | 1.5TBM | 2 AMD EPYC Genoa 9654 CPUs: 96 cores/CPU | 192 | N/A | 384MBCPU | |
| twig | 512GB | 64 | 4 A100 | 16MB |
Connecting to Vera
We take security very seriously! Be sure to read and comply with PSC password policies and guidelines on PSC guidelines on security, resource use, and privacy.
When you connect to Vera, you are connecting to a Vera login node. The login nodes are used for managing files, submitting batch jobs and launching interactive sessions. They are not suited for production computing.
Connect via ssh
Use an ssh client from your local machine to connect to hostname vera.psc.edu using the default port (22). You do not have to specify the port.
Read more about using SSH to connect to PSC systems.
Public-private keys
You can also use public-private key pairs to connect to Vera. To do so, you must first fill out this form to register your keys with PSC.
File spaces
There are two Vera filesystems, hildafs and verafs. You have a home directory on hildafs and a shared group scratch directory on verafs.
Your Vera home directory is /hildafs/home/username, where username is your PSC username. Your home directory has a 5GB quota. Your home directory is backed up.
Your group shares a scratch space available as /verafs/scratch/groupname, where groupname is your grant name. This scratch file space is NOT backed up. You can find your grant name by typing
id -gn
You can check your file usage using the command /opt/packages/allocations/my_quotas. Both your home directory and the scratch space available for your group are shown.
In addition, your project may have shared space in /hildafs/projects/projectname, where projectname is your grant name. If your project does not already have space in /hildafs/projects, you can request it.
Transferring files
You can use rync, scp or sftp to transfer files into and out of Vera.
Data Transfer Nodes for Vera
There are nodes dedicated to handling file transfers into Vera, named data.vera.psc.edu. Using these nodes will make file transfers more efficient and prevent disrupting other work on the Vera login nodes.
Paths for Vera file spaces
The start of the full paths for your Vera directories are:
Home directory      /hildafs/home/_username_
Scratch directory   /verafs/scratch/_groupname_/_username_
Project directory   /hildafs/projects/_groupname_/_username_
Transfers into your Vera file spaces
rsync
You can use the rsync command to copy files to and from Vera.
A sample rsync command to copy a file from your local machine to a Vera directory is
rsync -rltpDvp -e 'ssh -l username' source_directory data.vera.psc.edu:target_directory
A sample rsync command to copy a file from Vera to your local machine to is
rsync -rltpDvp -e 'ssh -l username' data.vera.psc.edu:source_directory target_directory
In both cases, substitute your username for username. By default, rsync will not copy older files with the same name in place of newer files in the target directory. It will overwrite older files in the target directory.
We recommend the rsync options -rltDvp. See the rsync man page for information on these options and other options you might want to use. We also recommend the option
-oMACS=umac-64@openssh.com
If you use this option your transfer will use a faster data validation algorithm.
You may want to put the rsync command in a loop to insure that it completes. A sample loop is
RC=1
n=0
while [[ $RC -ne 0 && $n -lt 20 ]]
 do
     rsync ...
     RC = $?
     let n = n + 1
     sleep 10
 done
This loop will try your rsync command 20 times. If it succeeds it will exit. If an rsync invocation is unsuccessful the system will try again and pick up where it left off, and will copy only those files that have not already been transferred. You can put this loop, with your rsync command, into a batch script and run it with sbatch.
scp
To use scp for a file transfer you must specify a source and destination for your transfer. The format for either source or destination is
_username_@_machine-name_:path/filename
For transfers involving Vera, username is your PSC username and the machine-name is vera.psc.edu.
An example scp command is
scp file username@vera.psc.edu:/verafs/scratch/groupname/username
File transfers using scp must specify full paths for Vera file systems. See Paths for Vera file spaces for details.
sftp
To use sftp, first connect to the remote machine:
sftp _username_@_machine-name_
When Vera is the remote machine, use your PSC userid as username and vera.psc.edu for the machine name. You will be prompted for your password on the remote machine. If Vera is the remote machine enter your PSC password.
You can then enter sftp subcommands, like put to copy a file from the local system to the remote system, or get to copy a file from the remote system to the local system.
To copy files into Vera you must either cd to the proper directory or use full pathnames in your file transfer commands. See Paths for Vera file spaces for details.
Software
The Module package
The Module package provides for the dynamic modification of a users' environment via module files. Module files manage necessary changes to the environment, such as adding to the default path or defining environment variables, so that you do not have to manage those definitions and paths manually.
Modules are also used to manage multiple versions of applications, tools, and libraries, and where name conflicts between multiple packages would cause problems.
Basic use
To see what modules are available for a software package, type
module avail package-name
To set up the environment for a software package, load that environment with the module load command.
module load package-name
Module commands
Some useful module commands are:
| module avail | Lists all the available modules |
| module avail foo | Lists all the available modules for package foo |
| module help foo | Displays help on module foo |
| module display foo | Indicates what changes would be made to the environment by loading module foo without actually loading it |
| module load foo | Loads module foo |
| module list | Lists your currently loaded modules |
| module swap foo1 foo2 | Switches loaded module foo1 with module foo2 |
| module unload foo | Reverses all changes to the environment made by previously loading module foo |
AI module
The AI module provides a rich, unified, Anaconda-based environment for AI, Machine Learning, and Big Data applications. It includes several popular AI/ML/BD packages, selected to work together well.
The AI environment is built for the GPU nodes on Vera. Be sure to use one of the GPU partitions.
Using the AI environment
To see the full list of software included in the AI environment, first load the module and then activate the environment with these commands:
module load AI
source activate $AI_ENV
To see what is included in $AI_ENV, type
conda list
Customize the AI environment
If you need software that is not in the pre-built environment, you can create a new environment by cloning the PSC defined one and then customizing it. First load the module and activate the PSC defined environment, as above, then clone it with
conda create --name *your-new-environment-name* --clone $AI_ENV
Then you can activate the new environment and proceed with your customization.
Example In this example, the user installs the h5py package in a new environment they are creating. Use the following commands. Note:
-
The conda list command shows what packages are currently installed. Check to see if what you need is already available. The conda list command also shows the version number of the installed packages.
-
The conda create command clones $AI_ENV to create a new environment. This can take a long time, so ask for an hour of time with the interact command.
-
Here, the new environment is named clone-env-1. The --prefix flag names the full path to the where the environment will be stored. You can name the environment anything you like and store it in any directory you like.
interact -gpu -t 01:00:00
 module load AI    # loads the default AI module
 source activate $AI_ENV
 conda list
 conda create --name clone-env-1 --clone $AI_ENV
 conda activate clone-env-1
 conda install h5py
Conda install will install the newest version of the package. If you want to install a version of the package not available in the public installations use the --revision option to the conda install command.
Installed software
| Package | Description | More information |
| Anaconda3 | Open data science platform | Anaconda Home Page |
| CFITSIO | Library of C and Fortran routines for reading and writing data in FITS format | FITSIO Home Page |
| CMake | Tools to control the compilation process, build, test and package software | CMake Home Page |
| CUDA | NVidia GPU development environment | CUDA Home Page |
| Eigen | C++ template library for linear algebra: matrices, vectors, numerical solvers and related algorithms | Eigen Home Page |
| FFTW3 | C subroutine library for computing the DFT in one or more dimensions, of arbitrary input size, of both real and complex data | FFTW Home Page |
| GCC | GNU compilers | Gnu Compiler Home Page |
| Go | Open source programming language | The Go Home Page |
| GSL | Gnu Scientific Library | GSL - GNU Scientific Library |
| Intel | Intel compilers and MPI library | C++ Developer Guide & Reference |
| Python | Powerful, object-oriented programming language | Python Home Page |
| Singularity | Open-source software container platform | Singularity Home Page |
Compilers
Intel and GNU compilers are available on Vera. You must load the compiler module before you can use them.
| Compiler type | Module load command | Command to compile | ||
| C | C++ | Fortran | ||
| Intel | module load intel | icc | icpc | ifort |
| Gnu | module load gcc | gcc | g++ | gfortran |
MPI programming
Three types of MPI are supported on Vera: MVAPICH2, OpenMPI and Intel MPI.
To compile an MPI program, you must do these things:
- Load the module for the compiler and the MPI type you want to use
- Load the module for that you want to use
- Issue the appropriate command to compile your program.
The three MPI types may perform differently on different problems or in different programming environments. If you are having trouble with one type of MPI, please try using another type. Contact help@psc.edu for more help.
Note: When using Intel MPI, you must set the environment variable I_MPI_JOB_RESPECT_PROCESS_PLACEMENT to 0. Otherwise the mpirun task placement settings you give will be ignored. The command to do this is:
For the BASH shell:
export I_MPI_JOB_RESPECT_PROCESS_PLACEMENT=0
For the CSH shell:
setenv I_MPI_JOB_RESPECT_PROCESS_PLACEMENT 0
Compiler commands for MPI programs
For the Intel compilers
| Use the Intel compilers with | Load this module | Compile with this command | ||
| C | C++ | Fortran | ||
| Intel MPI | intel | mpiicc
note the "ii" |
mpiicpc
note the "ii" |
mpiifort
note the "ii" |
| OpenMPI | intel | mpicc | mpicxx | mpifort |
| MVAPICH2 | mpi/intel_mvapich | mpicc code.c -lifcore | mpicxx code.cpp -lifcore | mpifort code.f90 -lifcore |
For the Gnu compilers
| Use the GNU compilers with | Load this module | Compile with this command | ||
| C | C++ | Fortran | ||
| OpenMPI | mpi/gcc_openmpi | mpicc | mpicxx | mpifort |
| MVAPICH | mpi/gcc_mvapich | |||
Running jobs
All production computing must be done on Vera's compute nodes, NOT on the login node. The SLURM scheduler (Simple Linux Utility for Resource Management) manages and allocates all of Vera's compute nodes.
To submit a job:
- create a file called a batch or job script
- submit that script to a partition (queue) using the
sbatchcommand - if you like, check on the job's progress as it waits in the partition and as it is running
- check the output file for results or any errors when it finishes
A simple example
This section outlines an example which submits a simple batch job. More detail on batch scripts, the sbatch command and its options follow.
Create a batch script
Use any editor you like to create your batch scripts. A simple batch script named hello.job which runs a "hello world" command is given here. Comments, which begin with '#', explain what each line does.
The first line of any batch script must indicate the shell to use for your batch job. Lines beginning with '#SBATCH' are used to define the partition to use, the number of nodes or the walltime requested, and more. See section below, "Options to the sbatch command", for a more complete list.
#!/bin/bash
# use the bash shell
#SBATCH -p RM
#SBATCH -t 2:10:00
#SBATCH -N 2

# The sbatch commands above request:
# run this job in the RM partition
# 2 hours and 10 minutes of walltime
# 2 nodes


set -x    # echo each command to standard out before running it
date      # run the Unix 'date' command
echo "Hello world, from Vera!"   # run the Unix 'echo' command
Submit the batch script to a partition
Use the sbatch command to submit the hello.job script.
[joeuser@m005 ~]$ sbatch hello.job
Submitted batch job 7408623
Note the jobid that is echoed back to you when the job is submitted. Here it is 7408623.
You can also give sbatch options on the command line. Options given on the command line take precedence over those in a job script. To use the RM partition, 2 hours and 10 minutes of walltime, and 2 nodes, the command would be:
[joeuser@m005 ~]$ sbatch -p RM -t 2:10 -N 2 hello.job
Check on the job progress
You can check on the job's progress in the partition by using the squeue command. By default you will get a list of all running and queued jobs. Use the -u option with your username to see only your jobs. See the squeue command for details.
[joeuser@m005 ~]$ squeue -u joeuser
JOBID   PARTITION NAME     USER    ST TIME NODES NODELIST(REASON)
7408623 RM        hello.jo joeuser PD 0:08 1     r005
The status "PD" (pending) in the output here shows that job 7408623 is waiting in the queue. See more about the squeue command below.
When the job is done, squeue will no longer show it:
Check the output file when the job is done
By default, the standard output and error from a job are saved in a file with the name slurm-jobid.out, in the directory that the job was submitted from.
[joeuser@m005 ~]$ more slurm-7408623.out
+ date
Sun Jan 19 10:27:06 EST 2020
+ echo 'Hello world, from Vera!'
Hello world, from Vera!
[joeuser@m005 ~]$
The sbatch command
To submit a batch job, use the sbatch command. The format is
sbatch -options batch-script
The options to sbatch can either be in your batch script or on the sbatch command line. Options in the command line override those in the batch script.
Options to the sbatch command
For more information about these options and other useful sbatch options see the sbatch man page.
| Option | Description | Default |
|---|---|---|
| -t HH:MM:SS | Walltime requested in HH:MM:SS | 30 minutes |
| -N n | Number of nodes requested | 1 |
| -p partition-name | Chose the partition to run the job in. Note that partition names are case-sensitive. | RM |
| -o filename | Save standard out and error in filename. This file will be written to the directory that the job was submitted from | slurm-jobid.out |
| --ntasks-per-node=n
Note the "--" for this option |
Request n cores be allocated per node | 1 |
| --gpus=type:n
Note the "--" for this option |
Specifies the number of GPUs requested. 'type' specifies the type of GPU you are requesting. The only currently valid type is "A100-40"
'n' is the total number of GPUs requested for this job |
|
| --mail-type=type
Note the "--" for this option |
Send email when job events occur, where type can be BEGIN, END, FAIL or ALL | None |
| --mail-user=user
Note the "--" for this option |
User to send email to as specified by -mail-type. Default is the user who submits the job | None |
| -d=dependency-list | Set up dependencies between jobs, where dependency-list can be:
after:job_id[:jobid...]
afterany:job_id[:jobid...]
aftercorr:job_id[:jobid...]
afternotok:job_id[:jobid...]
afterok:job_id[:jobid...]
singleton
|
None |
| --no-requeue
Note the "--" for this option |
Specifies that your job will not be requeued under any circumstances, even if the node fails. Note the "--" for this option. | NA |
| --time-min=HH:MM:SS
Note the "--" for this option. |
Specifies a minimum walltime for your job in HH:MM:SS format
SLURM considers the walltime requested when deciding which job to start next. Free slots on the machine are defined by the number of nodes and how long those nodes are free until they will be needed by another job. By specifying a minimum walltime you allow the scheduler to reduce your walltime request to your specified minimum time when deciding whether to schedule your job. This could allow your job to start sooner. If you use this option your actual walltime assignment can vary between your minimum time and the time you specified with the -t option. If your job hits its actual walltime limit, it will be killed. When you use this option you should checkpoint your job frequently to save the results obtained to that point. |
None |
| -h | Help, lists all the available command options |
Vera partitions
There are several partitions (queues) on Vera which allow access to the public nodes.
| Partition Name | Nodes |
| RM | r001-r032 |
| HENON | henon01-henon-08 |
| HENON-GPU | henon-gpu01 |
| MIKO | miko |
| RITA-GPU | rita |
| SIRIUS | sirius |
| TWIG-GPU | twig |
The scheduler follows policies to ensure that one user does not dominate the machine. Jobs receive a priority based on the Fair Tree algorithm. When the top priority job will not fit, SLURM will try to schedule the next highest priority job. There are also limits to the number of nodes and cores a user can simultaneously use. Scheduling policies are always under review to ensure best turnaround for users.
Node, partition, and job status information
sinfo
The sinfo command displays information about the state of Vera's nodes. The nodes can have several states:
| alloc | Allocated to a job |
| down | Down - not available for scheduling |
| drain | Not available for scheduling |
| idle | Free - available for scheduling |
| resv | Reserved - part of a reservation; not available outside of that reservation |
For more information see the sinfo man page.
squeue
The squeue command displays information about the jobs in the partitions. Some useful options are:
| -j jobid | Displays the information for the specified jobid |
| -u username | Restricts information to jobs belonging to the specified username |
| -l | (long) Displays information including: time requested, time used, number of requested nodes, the nodes on which a job is running, job state and the reason why a job is waiting to run. |
See the squeue man page for a discussion of the codes for job state, for why a job is waiting to run, and more options.
scancel
The scancel command is used to kill a job in a partition, whether it is running or still waiting to run. Specify the jobid for the job you want to kill. For example,
scancel 12345
kills job # 12345.
For more information, see the scancel man page.
sacct
The sacct command can be used to display detailed information about jobs. It is especially useful in investigating why one of your jobs failed. The general format of the command is
sacct -X -j _nnnnnn_ -S MMDDYY --format parameter1,parameter2, ...
Where
- nnnnn is the jobid of the job you are investigating.
- the date given for the -S option is the date at which
sacctbegins searching for information about your job. - the commas between the parameters in the --format option cannot be followed by spaces.
The --format option determines what information to display about a job. Useful parameters are
- JobID
- Account - the account id
- ExitCode - useful in determining why a job failed
- State - useful in determining why a job failed
- Start, End, Elapsed - start, end and elapsed time of the job
- NodeList - list of nodes used in the job
- NNodes - how many nodes the job was allocated
- MaxRSS - how much memory the job used
- AllocCPUs - how many cores the job was allocated
For more information, see the sacct man page.
Monitoring memory usage
It can be useful to find the memory usage of your jobs. For example, you may want to find out if memory usage was a reason a job failed.
You can determine a job's memory usage whether it is still running or has finished. To determine if your job is still running, use the squeue command.
squeue -j nnnnnn -O state
where nnnnnn is the jobid.
For running jobs: srun and top or sstat
You can use the srun and top commands to determine the amount of memory being used.
srun --jobid=nnnnnn top -b -n 1 | grep username
Where
- nnnnnn is the jobid
- username is your username
The RES field in the output from top shows the actual amount of memory used by a process. The top man page can be used to identify the fields in the output of thetop command.
See the man pages for srun and top for more information.
You can also use the sstat command to determine the amount of memory being used in a running job
sstat -j nnnnnn.batch --format=JobID,MaxRss
where _nnnnnn _is your jobid.
See the man page for sstat for more information.
For jobs that are finished: sacct or job_info
If you are checking within a day or two after your job has finished you can issue the command
sacct -j nnnnnn --format=JobID,MaxRss
If this command no longer shows a value for MaxRss, use the job_info command
job_info nnnnnn | grep max_rss
Substitute your jobid for nnnnnn in both of these commands.
See the man page for sacct for more information.
For more information, see the online documentation for SLURM, including man pages for all the SLURM commands.
OnDemand
The OnDemand interface allows you to conduct your research on Vera through a web browser. You can manage files - create, edit and move them - submit and track jobs, see job output, check the status of the queues, run a Jupyter notebook through JupyterHub and more, without logging in to Vera via traditional interfaces.
OnDemand was created by the Ohio Supercomputer Center (OSC). In addition to this document, you can check the extensive documentation for OnDemand created by OSC, including many video tutorials, or email help@psc.edu.
Start OnDemand
To connect to Vera via OnDemand, point your browser to https://ondemand.vera.psc.edu.
- You will be prompted for a username and password. Enter your PSC username and password.
- The OnDemand Dashboard will open. From this page, you can use the menus across the top of the page to manage files and submit jobs to Vera.
To end your OnDemand session, choose Log Out at the top right of the Dashboard window and close your browser.
Manage files
To create, edit or move files, click on the Files menu from the Dashboard window. A dropdown menu will appear, listing file spaces on Vera, including your home directory, the path to your projects home directory, and /opt/packages.
Choosing one of the file spaces opens the File Explorer in a new browser tab. The files in the selected directory are listed. You can always jump to your home directory by clicking the folder icon labeled Home Directory in the left panel.
There are two sets of buttons in the File Explorer.
Buttons on the top left just below the name of the current directory allow you to View, Edit, Rename, Download, Copy or Paste (after you have moved to a different directory) the selected file(s), or you can select or unselect all files with (Un)Select All.

Buttons in the top right perform these functions:
| Go To | Navigate to another directory or file system |
| Open in Terminal | Open a terminal window on Vera in a new browser tab |
| New File | Creates a new empty file |
| New Dir | Create a new subdirectory |
| Upload | Copies a file from your local machine to Vera |
| Show Dotfiles | Toggles the display of dotfiles |
| Show Owner/Mode | Toggles the display of owner and permisson settings |

Create and edit jobs
You can create new job scripts, edit existing scripts, and submit those scripts to Vera through OnDemand.
From the top menus in the Dashboard window, choose Jobs > Job Composer. A Job Composer window will open.
There are two tabs at the top:Jobs and Templates.
Under the Jobs tab, you will see two buttons: +New Job and Create Template.
If you have never run a job through OnDemand, a help prompt opens under the +New Job button. It will walk you through the steps for creating, submitting, stopping or deleting a job.
If you have run jobs through OnDemand previously, the jobs are listed.
Create a new job script
To create a new job script:
1. Select a template to begin with
2. Edit the job script
3. Edit the job options
1. Select a template
- Go to the Jobs tab in the Job Composer window. You have been given a default template, named Simple Sequential Job.
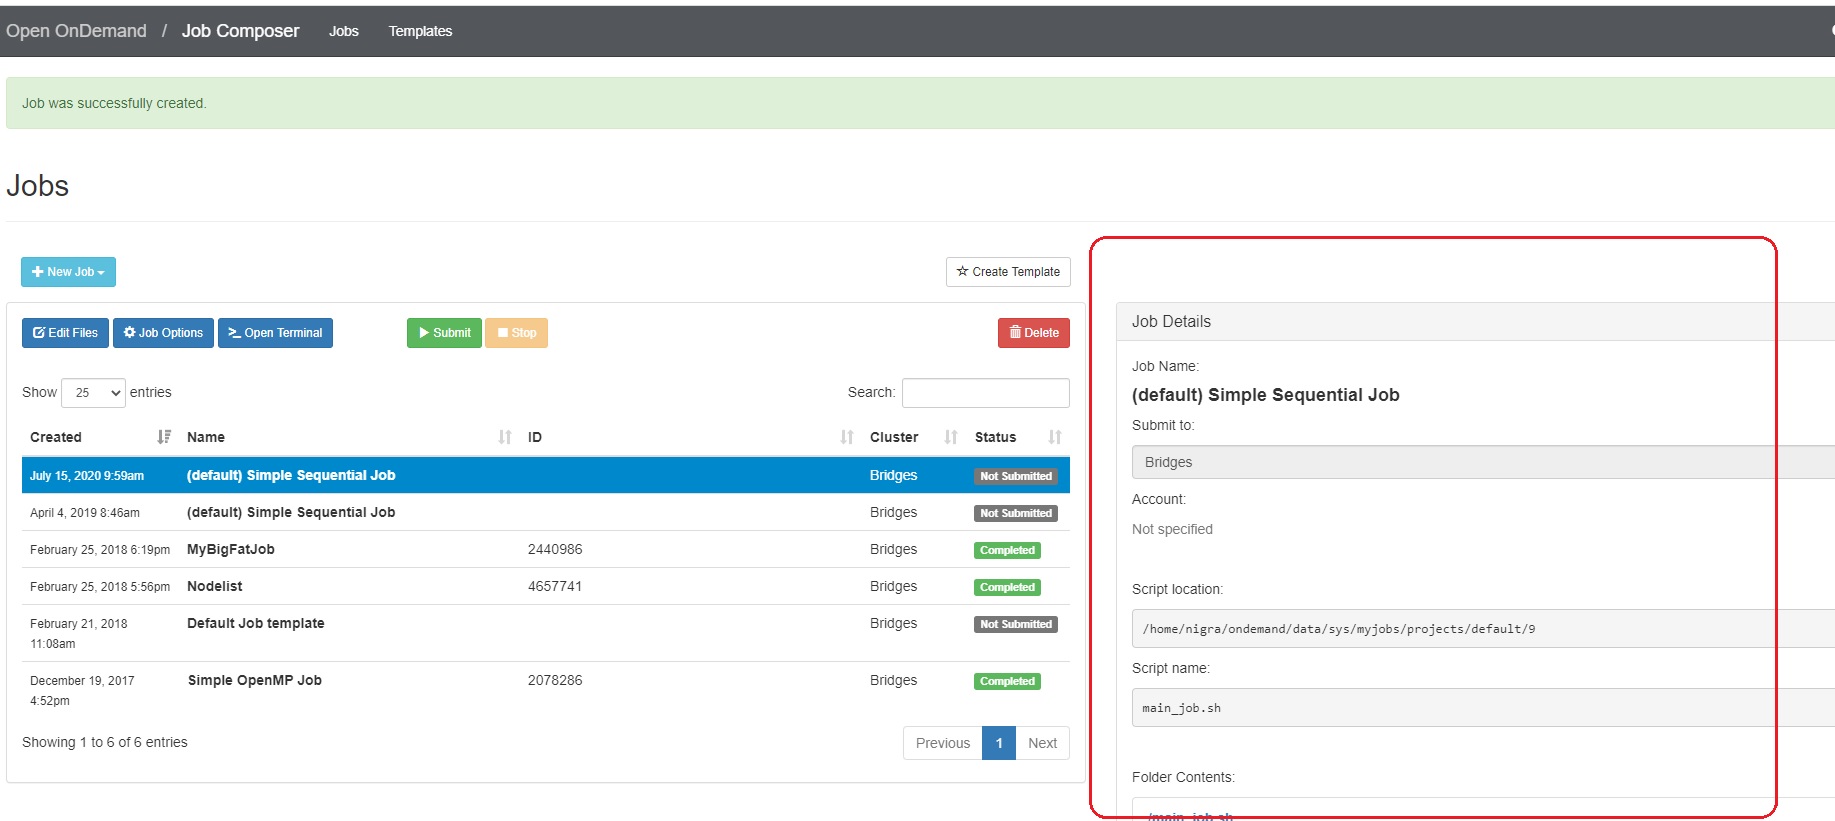
- To create a new job script, click the blue + New Job > From Default Template button in the upper left. 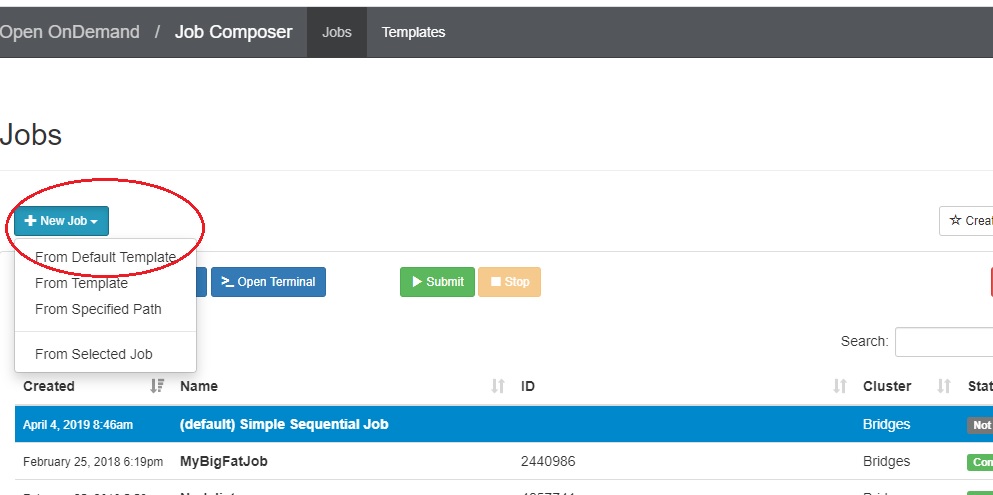 You will see a green message at the top of the window, "Job was successfully created".
At the right of the Jobs window, you will see the Job Details, including the location of the script and the script name (by default, main_job.sh). Under that, you will see the contents of the job script in a section titled Submit Script.
2. Edit the job script
Edit the job script so that it has the commands and workflow that you need.
If you do not want the default settings for a job, you must include options to change them in the job script. For example, you may need more time or more than one node. Use an SBATCH directive in the job script to set these options.
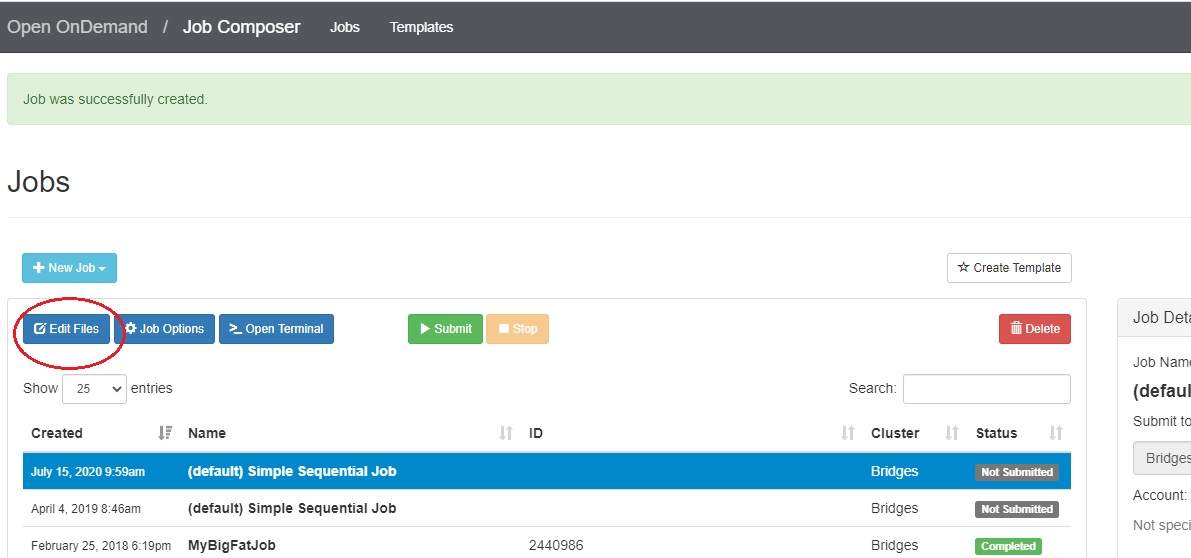
There are two ways to edit the job script: using the Edit Files button or the Open Editor button. First, go to the Jobs tab in the Jobs Composer window.
Either: Find the blue Edit Files tab at the top of the window
Or: Find the Submit Script section at the bottom right. Click the blue Open Editor button.
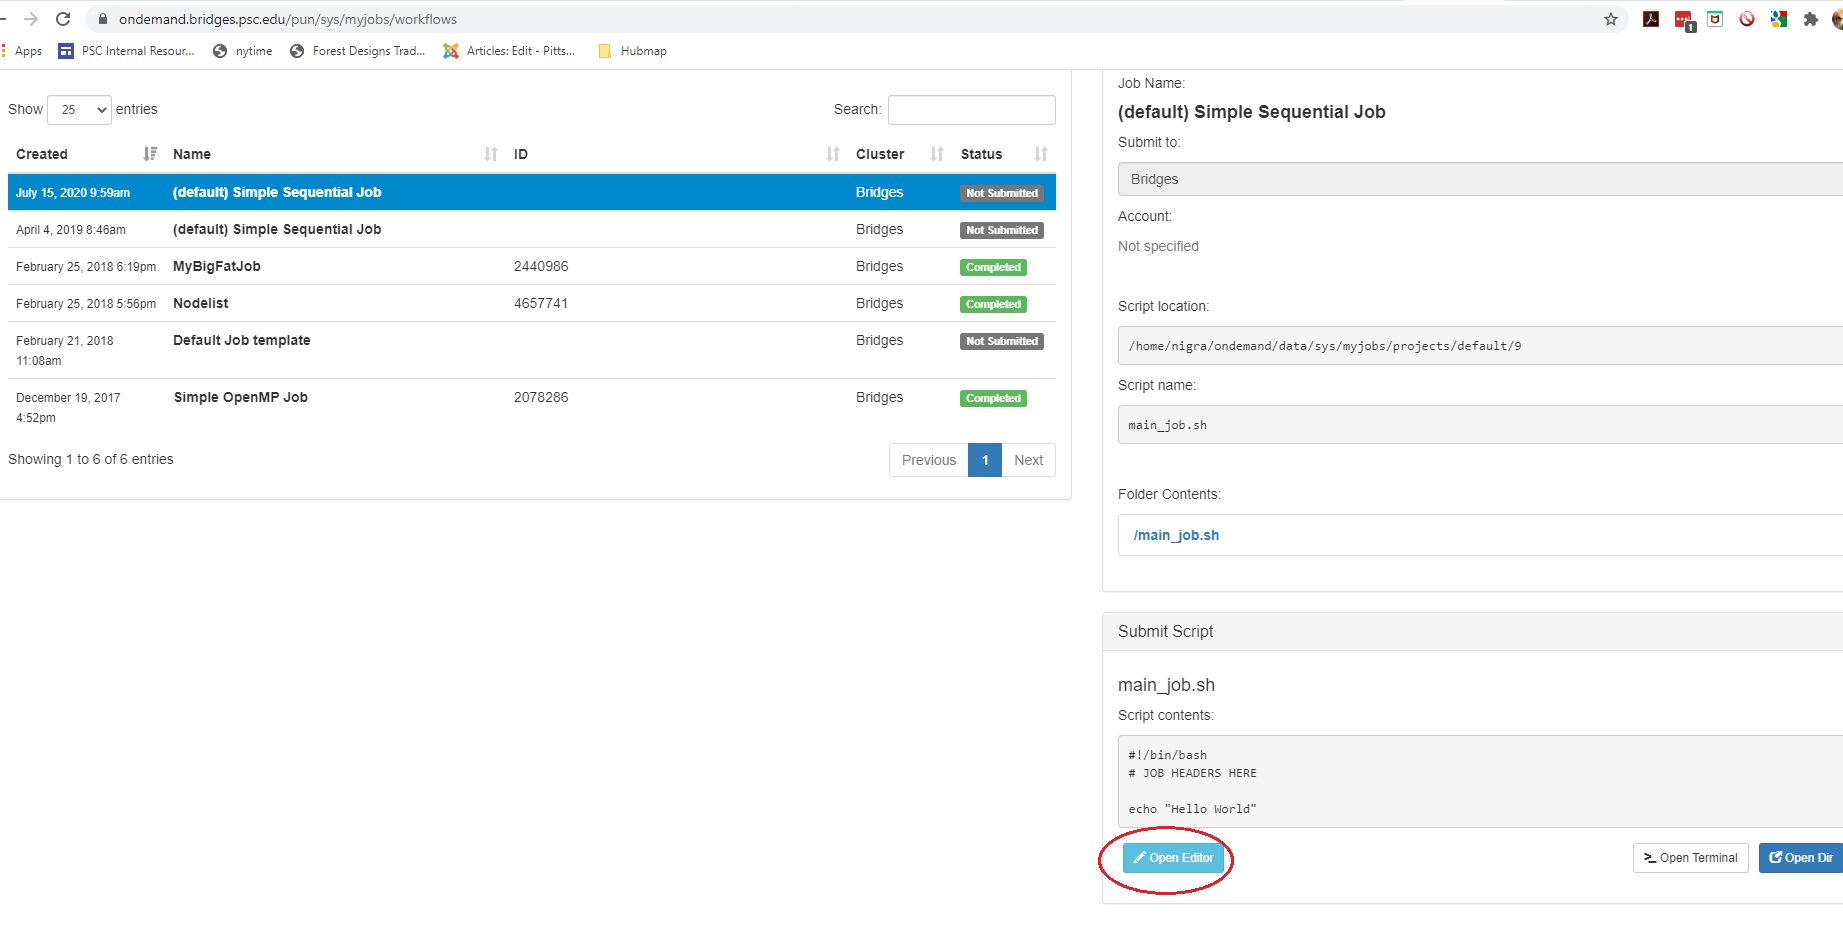
In either case, an Editor window opens. Make the changes you want and click the blue Save button.
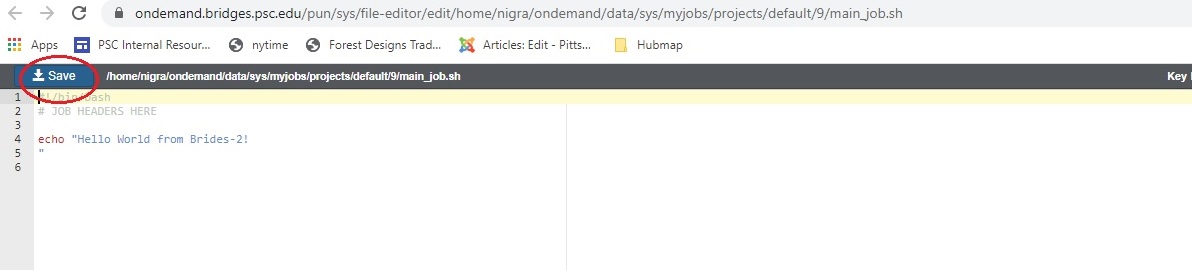
After you save the file, the editor window remains open, but if you return to the Jobs Composer window, you will see that the content of your script has changed.
3. Edit the job options
In the Jobs tab in the Jobs Composer window, click the blue Job Options button.
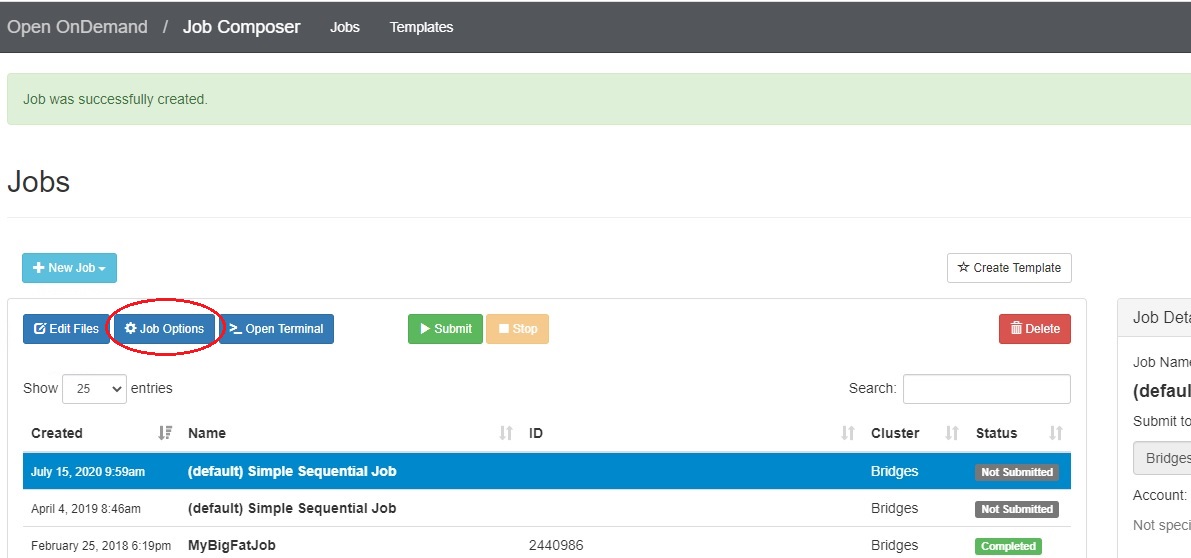
The options for the selected job such as name, the job script to run, and the account to run it under are displayed and can be edited. Click Reset to revert any changes you have made. Click Save or Back to return to the job listing (respectively saving or discarding your edits).

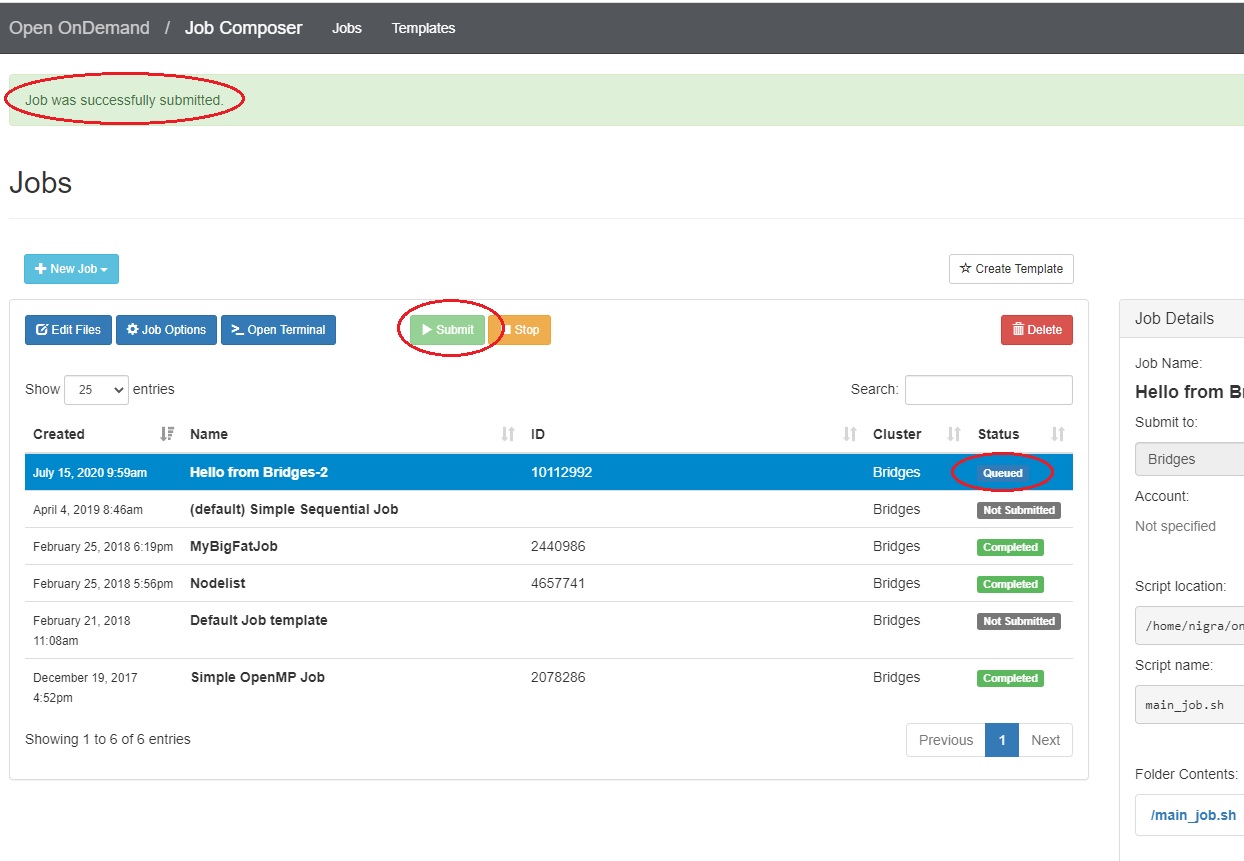
Submit jobs to Vera
Select a job in the Jobs tab in the Jobs Composer window. Click the green Submit button to submit the selected job. A message at the top of the window shows whether the job submission was successful or not. If it is not, you can edit the job script or options and resubmit. When the job submits successfully, the status of the job in the Jobs Composer window will change to Queued or Running. When the job completes, the status will change to Completed.
JupyterHub
You can run JupyterHub notebooks, through OnDemand.
- Select Interactive Apps >> Jupyter Notebooks from the top menu in the Dashboard window.
- In the screen that opens, specify the timelimit, number of nodes, and partition to use. If you have mutiple grants on Vera, you can also designate the account to deduct this usage from.
- Use the Extra Args field to specify the number of cores or number of GPUs you want.
- Use the Extra Jupyter Args field to pass arguments to your Jupyter notebook.
- Click the blue Launch button to start your JupyterHub session. You may have to wait in the queue for resources to be available. 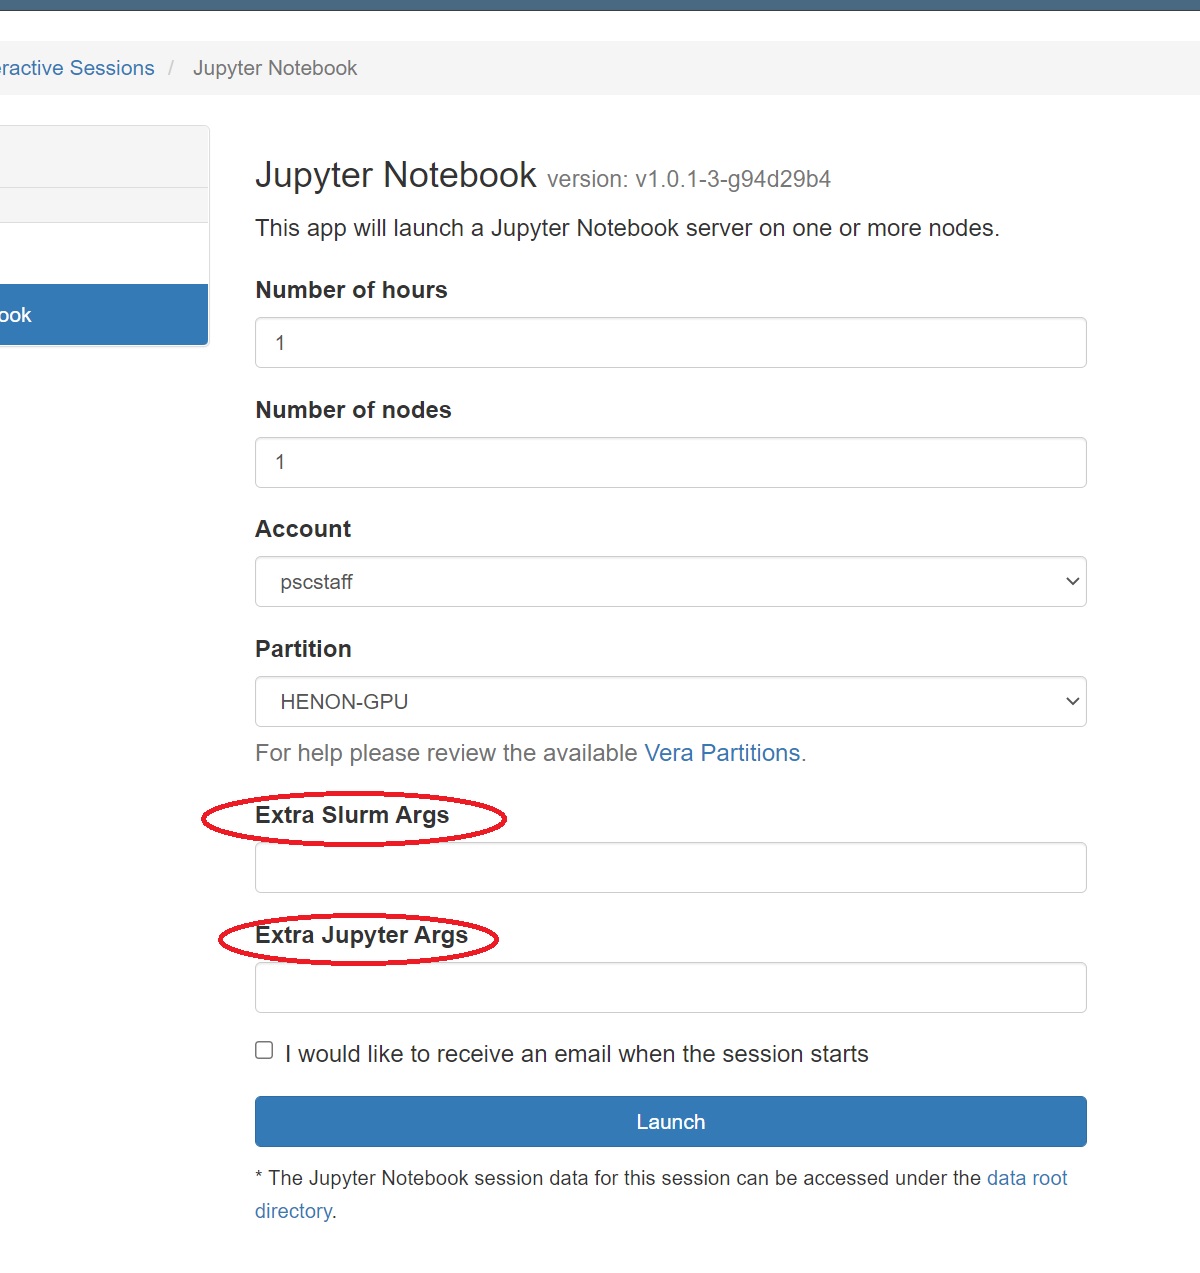
- When your session starts, click the blue Connect to Jupyter button. The Dashboard window now displays information about your JupyterHub session including which node it is running on, when it began, and how much time remains. A new window running JupyterHub also opens. Note the three tabs: Files, Running and Clusters.Files
By default you are in the Files tab, and it displays the contents of your Bridges home directory. You can navigate through your home directory tree.
Running
Under the Running tab, you will see listed any notebooks or terminal sessions that you are currently running.
- Now you can start a Jupyter notebook:
- To start a Jupyter notebook which is stored in your home directory space, in the Files tab, click on its name. A new window running the notebook opens.
- To start a Jupyter notebook which is stored in your ocean directory, you must first create a symbolic link to it from your home directory. While in your home directory, use a command like
ln -s /ocean/projects/yourgroup/youruserid OCEANDIR
When you enter JuypterHub, you will see the entry OCEANDIR in your list of files under the Files tab. Click on this to be moved to your directory.
Errors
If you get an "Internal Server Error" when starting a JupyterHub session, you may be over your home directory quota. Check the Details section of the error for a line like:
#<ActionView::Template::Error: Disk quota exceeded @ dir_s_mkdir - /home/joeuser/ondemand/data/sys/dashboard/batch_connect/sys/jupyter_app...............
You can confirm that you are over quota by opening a Bridges-2 shell access window and typing
du -sh
This command shows the amount of storage in your home directory. Home directory quotas are 10GB. If du -sh shows you are near 10GB, you should delete or move some files out of your home directory. You can do this in OnDemand in the File Explorer window or in a shell access window.
When you are under quota, you can try starting a JupyterHub session again.
Stopping your JupyterHub session
In the Dashboard window, click the red Delete button.
Security guidelines and policies
See the PSC Policies page for PSC policies regarding privacy, security and the acceptable use of PSC resources. Questions about any of these policies should be directed to help@psc.edu.